Transcript
In the last episode, you heard the story of Albert Andoh, a child entrepreneur who has the opportunity to double the size of his team with additional funding. His parents hired a consultant, Victoria, who introduces them to the Kasennu Framework for creating business infrastructure. Specifically, they create a business design blueprint to illustrate the company’s growth plan.
Over the next few years, that information is used to pitch a group of investors. I’m Alicia Butler Pierre, and you’re about to learn how Victoria helped Albert create a business design blueprint. By the end of this episode, you’ll know how to create one that illustrates your own company’s growth plan. Get your notepads ready, classes back in session.
This is Season 15, Episode 185: How to Create a Business Design Blueprint.
Let’s start the show!
Welcome to Business Infrastructure, the podcast about curing back-office blues of fast-growing businesses. If you’re a business owner or operator looking for practical tips and solutions to scaling your business in a sustainable manner, you’re in the right place. Now here’s your hostess, Alicia Butler Pierre.
Be honest. What comes to mind when you think of an organizational chart, do you even have one for your small business? If not, then don’t beat yourself up over this. As powerful a tool as it is, believe it or not, most small businesses either don’t have one or they use it ineffectively.

In fact, I’ll let you in on a little secret. Many people that I’ve worked with in large enterprises, either can’t locate their organizational chart or it’s so cumbersome to interpret that it loses its effectiveness. Now, if you haven’t had the benefit of working in one of those larger enterprises, you truly may not have ever seen an organizational chart. So let me go ahead and first define what that is.
According to businessdictionary.com,
“…an organizational chart is a visual representation of how a firm intends authority, responsibility, and information to flow within its formal organizational structure.”
But you know what, there’s still something missing from traditional org charts. They can also illustrate maturity and growth opportunities. And that’s valuable information, not only for your team but for others in your entire ecosystem, including lenders, investors, suppliers, contractors that you might work with. So for those reasons, I actually don’t like using the term organizational chart.
Instead, I refer to the visual illustration of how your organization is structured as a business design blueprint, you are literally drawing the blueprint that demonstrates how your business is designed for future growth. The business design blueprint links the departments and the resources that you identified during that business parts analysis exercise and it arranges them into a visual chain of command that also can show the path for promotion.

It also represents the second element of the Kasennu framework for business infrastructure. As a reminder, business infrastructure is a system for linking people, processes, and tools into a cohesive framework that allows you to scale sustainably and profitably. There’s six main steps I’ll describe for creating a business design blueprint.
As with our last lesson, keep in mind that the information you’re about to hear will be at a high-level summary, and it will also describe “analog techniques”. And that’s simply because it’s easier to describe in an audio format, but this certainly can be done electronically as well. In fact, I highly recommend that the final output be done using software. So let’s get to it.
Like the Business Parts Analysis, the very first step in creating a business design blueprint is to prepare. That preparation stage. And here are the things that you’ll need to prepare for the business design blueprint. First, you’re going to actually reuse the index cards that you had in the business parts analysis exercise.
Remember those cards where you wrote the names of the departments? You can either reuse those index cards, or you can write them on two new ones, new index cards. And in fact, I recommend that you do, just go ahead and write them out onto a separate set of index cards. That way you don’t have to disturb the information that you used in the original business parts analysis exercise. You also want to use a different color notecard to represent the roles or the positions that you identified also in the Business Parts Analysis.
Again, you can reuse the index cards that you already wrote on during the business parts analysis, but just to keep things kind of clean and to keep all of that information that you came up with during the business parts analysis separate, you can definitely just go ahead and write on a new, fresh set of different colored index cards. You’ll also need a rubber band so that you can kind of group everything together once you finished creating your business design blueprint and at least three different color markers or pins.
I recommend red, black, and blue, and you’ll find out later why, but you can certainly use any three colors that you’d like. You’ll also need access to a software, a drawing type of software. So something like Microsoft PowerPoint or Visio, Google slides, or whatever your preferred drawing software is. As with the business parts analysis again, you’ll also need access to a large table or something with a relatively large flat surface that you can start to spread these index cards across.
And lastly, you’ll need the same people that participated in the business parts analysis exercises with you. You’ll want to invite them to this business design blueprint exercise as well. Now I say that with a caveat – you may in fact decide that you only want upper management to participate.
And that is definitely understandable, but I will just ask you to consider at least communicating with everyone else on your team or within the company, letting them know that although they may not participate in creating the actual business design blueprint, definitely let them know that that is something that you are actively working on as a next step in building business infrastructure.
So that takes us to Step Two – Layout the Departments. So here’s what you’re going to do. And here’s where the analog exercise comes back into play. So, remember when I said that the business parts analysis exercise is foundational to all of the other elements for creating business infrastructure?

Well, here’s why I say that. You’re going to, again, leverage the information that came out of those exercises in the Business Parts Analysis to create your Business Design Blueprint, namely all of the departments that you all identified as well as all of the roles or the positions that were identified. You’re going to write the names of all of those departments again on two different index cards. And I want you to spread those index cards in a row on that table horizontally.
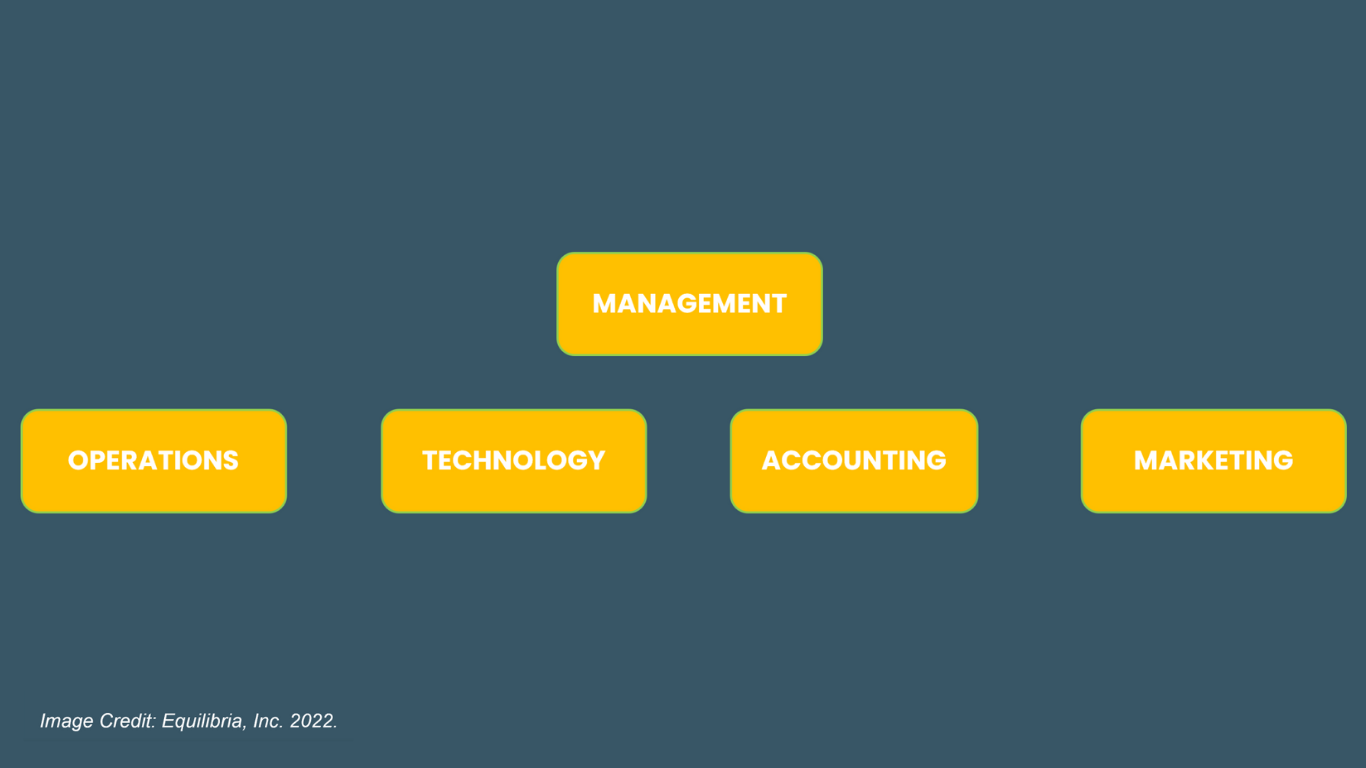
The next thing that you’re going to do is put the department that represents upper management above that horizontal row of other index cards that contain the names of the other departments. So for example, in my company, Equilibria, Management is the name of the department that represents the department that I would say that I’m over, that I have ultimate authority and domain over. And so because that department represents everyone else who’s also in upper management at Equilibria.
That department appears at the very top, almost like a top layer if that’s the way you want to think of it. Now I do want to make a quick note here. You can completely bypass the second step if you don’t want to do this again, using a more analog or visual exercise. If you want to go straight to the software to do this, you definitely can.
But if you especially are inviting other people to participate in this exercise with you and you do all have the benefit of being in the same room at the same time, then I definitely encourage that you just whip out those index cards again and start laying them across the table and figuring out what do our departments look like and which departments go above the others. Okay.
Now let’s go on to step number three. You want to determine the spatial arrangement of all of those roles and positions that were identified. Remember in the Business Parts Analysis, you not only identified roles that are currently filled in your organization, but you also identified those roles or positions that are either outsourced or roles that you recognize you need to have, but maybe vacant.
We want to take all of that information and put that, write those names of those positions onto different color index cards. So let’s say for example, if you are using yellow index cards to represent all of the departments, you might want to use green or blue to represent the different roles or positions within your company. Before you commit to writing the names of each role or position onto a different colored index card. I want you to quickly think about how you’re going to color-code those names.

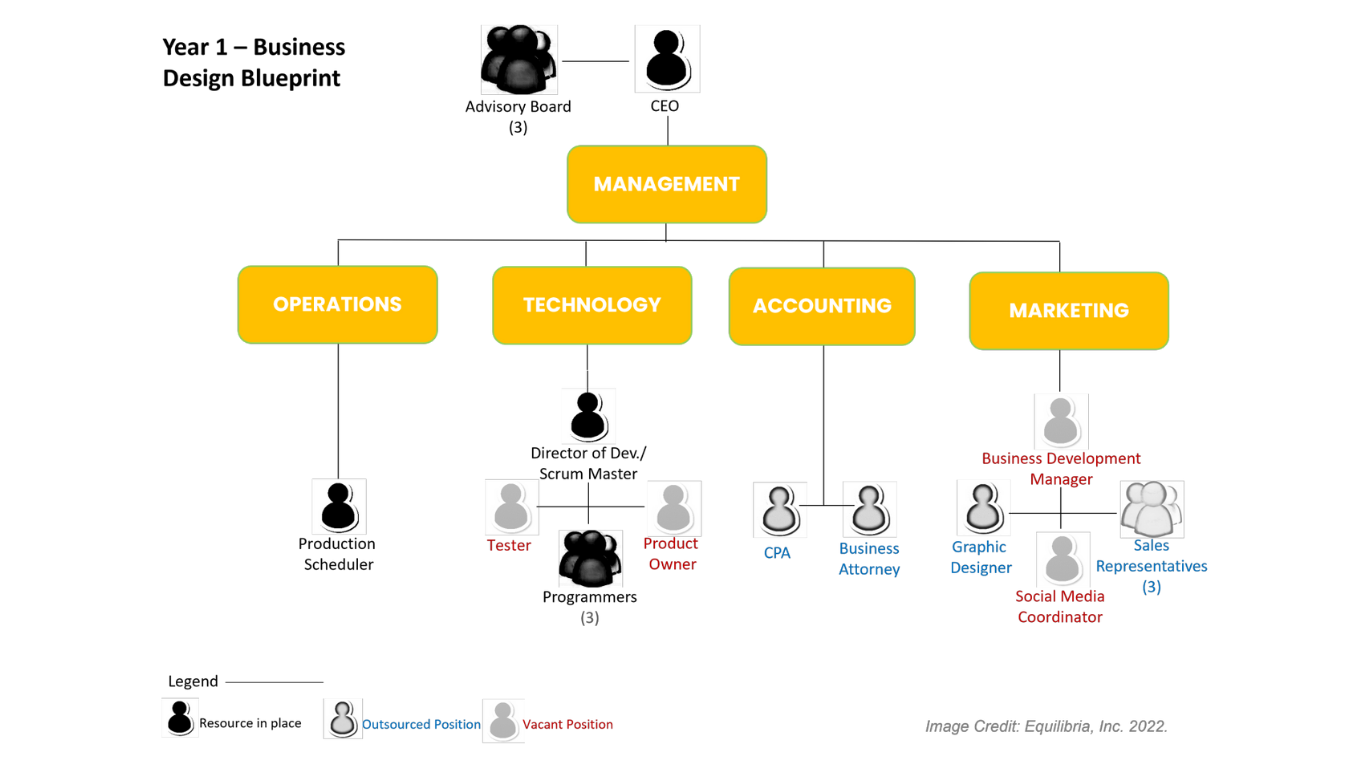
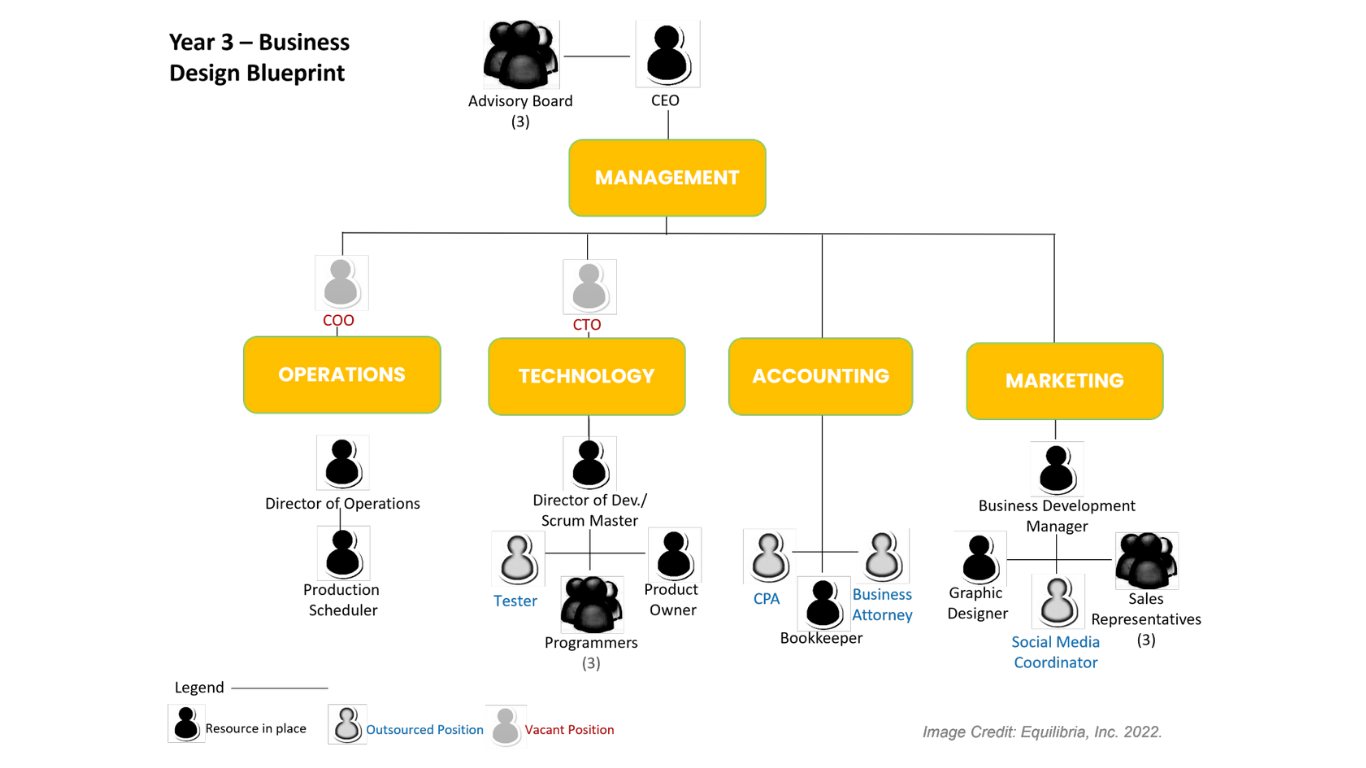
And this is what I mean – when I’m doing this exercise with my clients, whenever I’m creating a business design blueprint, not just for my company Equilibria, but for others as well. I always use black ink or a black marker to write down the name of any position that is already filled. I use blue to represent any outsourced position and red to represent any vacant position. Red because red really stands out, especially once you actually draw this on the software.
You can even add more colors if you want to. I don’t recommend that because then it can get really busy from a color-coding perspective and can come across as kind of, I hate to say, kind of “Facebooky.” That’s, I think, that’s one of the things that bugs me so much about Facebook, is the interface. It’s a little bit too colorful, but if that’s what you want to do, if that’s your jam, then by all means, go for it.
But you can add more colors to represent full-time versus full-time filled positions as well. You’re going to take each of those index cards that represents a role or a position. And by the way, at Equilibria, we actually use stick figures. If you can’t get those stick figures, then of course just stick with the index cards. But we do use stick figures instead of a different colored index card.
Place any position that represents upper management or anyone who might have some type of C-suite position, supervisor position, director, manager, something that indicates authority or dominion, for lack of a better word over a department. You want to place that index card above the name of that department. So if you have a position that is called the Chief Technology Officer, as in the case with Albert Andoh, then that index card would actually go above the index card that says Technology.
Okay. So what I’m going to do at this point, I’m actually going to open up my first copy of Behind the Facade, the book where we’ve been, that I wrote, where we’ve been grabbing all of these stories of these different entrepreneurs that you’ve been hearing. And I’m going to…I’m looking at page 82 actually in Behind the Facade: How to Structure your Company Operations for Sustainable Success.
And I’m going to describe to you the organizational chart that Victoria helped Albert and his Uncle Selom come up with. So the very first thing that I see is an advisory board, the CEO, and both of those stick figures are above a Management department.
Now, underneath the Management department, these are the following departments that I see (and again, they’re going across in a horizontal row): Customer Experience, Sales, Design, Production & Testing, Billing & Compliance, and Human Resources. All of the other roles and positions that were identified for their company actually come underneath these different departments that I just listed.
So as an example, under the Billing & Compliance department, I see a stick figure representing the CPA. And I see another stick figure representing the business attorney. And again, those two positions both happen to be written, their titles are written in blue ink to indicate that although these are not full-time or employee positions, they are outsourced positions that are actually filled.
So I hope this is making sense and that you’re keeping up with me so far. At this point, you should technically have two layers of management. The one, again at the very top representing upper management and the one representing management over the other departments.
Now it’s possible that your company may not have any managers currently overseeing the other departments and that’s okay. All managerial paths may currently lead to you. However, the goal is to eventually add more managers as your business continues to grow.
The next thing that you want to do is, especially again, if you are doing this exercise with other people, you want to solicit their feedback. Once you’ve solicited feedback, and you’ve started to make updates to your business design blueprint. Again, considering that you’re all working on this as a team. Now you’re ready to actually take what you have in front of you physically spread out onto a table with index cards and maybe even potentially stick figures.
Now it’s time to move on to step four. And that is actually drawing your Business Design Blueprint in software. So I prefer Microsoft Visio. That’s where I do all of my process sketching, process mapping, even the Business Design Blueprint. But Visio, unless you are a frequent user of it, I definitely would not recommend that you purchase a license for it. Instead, there’s so many other tools. I always recommend using what you already have.

If you use Microsoft PowerPoint, you can of course create your Business Design Blueprint in PowerPoint. You can also use Google Slides. There’s another tool called Miro. There’s SmartDraw. There’s a whole host. The idea is to make sure that whatever tool that you use, that you can actually download a digital copy of your final sketch. That way you can then email it and share it with other people on your team and throughout your entire ecosystem.
There’s some tips that I want to share with you as you actually draw this out. Using software, as draw boxes to represent the departments, make sure you color code them. If that was something that you decided to go ahead and do as part of the Business Parts Analysis exercise, you may not have color-coded it. That’s okay. But if you have, now is the time to go ahead and make sure that if you assign the color red to Marketing, that you draw a box that has the word Marketing written in that box, and then you actually shade that box, the color red you may have just decided to associate the color yellow with Human Resources.
Again, you would do the same thing, draw a box, type the words – Human Resources, preferably in all capital letters, and then just shade it yellow. Here’s something that I really want to implore you to do, do not use boxes to represent the different roles or positions. Instead use a people icon, a stick figure icon, something that you can find in that particular software that you’re using that represents a person or a group of people.
This is going to really help your Business Design Blueprint. It’s going to show people, “Oh, that’s me!” When they look at your chart it will allow them to easily see which department they are associated with and what that chain of command looks like. And it also will show them that path for promotion. Once you’ve done all of that, make sure you add a legend at the bottom of the page.
So if you have some color coding going on with the types of positions, that’s where you want to make sure you add that information to the legend. Your legend may say something to the effect of black equals filled position. Red equals vacant position. Blue equals outsourced position. And there you have it. That’s your legend to describe the color-coding that people will see when they see the name of each position on your Business Design Blueprint.
Next step, step five – save and distribute. So now that you’ve drawn this in software, go ahead and download and save a digital copy to a designated location that might be on your network. It might be in the cloud – whatever storage location you and your team decide on. And then go ahead and distribute it first to everyone who participated in the exercise. And I recommend giving yourselves at least a week to mull over the details and gather any additional feedback.
Sometimes it’s one thing to see things as it’s spread out on a table, but then you may see it in a different light once you actually see it represented digitally. So again, give yourself time to be able to gather additional feedback and make additional adjustments as necessary. Then you can share it with the overall team at large.
Now I also highly recommend considering meeting with each person so that the path for promotion is clear. Don’t just send this email out unless you have a really large team. Don’t just send the email out and just say, “Okay, this is the new organizational structure for our company. And it’s called a Business Design Blueprint.”
If you are fortunate enough to have a small enough team where you can literally set aside a little time, even if it’s just 15 minutes, just to have that one-on-one personalized attention and conversation with each person on your team to explain what it is, what it represents and the role that they play and how they can potentially move up the ranks so to speak within your organization, especially as your company continues to grow.
Add the Business Design Blueprint as part of the onboarding package for future team members. And you can also add it as a supplement. This was what Albert Andoh did and his story. They actually added that Business Design Blueprint as a supplement to a strategic growth plan. It can also be a supplement to any business plans that you might have.
Step six, track your progress against the future state. So at this point, you’re kind of looking at what your company is at ground-zero, what does the company look like right now? And, in terms of an immediate or short-term future, these are the roles that we think we need to have. This is the direction that we’re going in with the company.

You want to make sure that you’re tracking your progress against that hiring strategy that you developed from the business parts analysis exercise, and then going ahead and updating your business design blueprint as those vacant positions are filled and as people leave. It’s a way to chart your progress in a very, very visual way. You can also consider creating a year three or even a year five or year ten version that aligns with your longer-term strategic goals.
Like Albert and Victoria, you can expect to spend about two to three weeks on this at a minimum, but I definitely don’t recommend doing it faster than that because you’ll need time to think. And once you’ve created your business design blueprint, don’t put it on the proverbial shelf to collect dust, use it. You know, the expression, “A picture is worth a thousand words?”
If there’s any tool that demonstrates what your company looks like on the inside, it’s this! Think of your Business Design Blueprint as a vision board. It gives a clear picture of how you plan to grow your company, making it possible for others to rally around your idea. This minimizes the risks of insubordination, sabotage, and high turnover.

It’s also a comprehensive picture because it accurately displays your ecosystem, vendors, suppliers, contractors, freelancers, consultants, even an advisory board. This can be especially helpful if you describe yourself as a solopreneur, but keep in mind the more layers of management you start to add, the less lean your business design blueprint becomes, and the greater the likelihood you’ll create a pyramid structure.
It’s important to note that additional management layers can be added above or below a department, but it is discouraged unless you absolutely have to. Remember, part of what makes small businesses so attractive to many clients, whether they be other businesses, individuals, even the government, is reduced layers of management.
As your business grows, you’ll no longer be able to get involved in as many day-to-day operational and administrative decisions. You just won’t have the time. You’ll need to focus more on business development, finances, and other revenue-generating activities, a lean Business Design Blueprint lets people know that decisions can be made relatively quickly within your company without complicated layers of bureaucracy. Not to mention, it can give your company a competitive advantage over a much larger competitor.
Together, the Business Parts Analysis and the Business Design Blueprint provide the clarity and precision needed to project an efficiently structured, well-polished, and professional image necessary to retain quality clients and personnel. And now that you have defined your company’s departments, associated roles, and chain of command, you’re ready to better organize your workspace, capture your records management systems and streamline your key business processes.

I hope you found this lesson helpful. If so, please leave a five-star rating and a review. If you want more details about creating a business design blueprint, then click the resources link in this episode’s description. It’ll lead you to our website BusinessInfrastructure.TV that’s where you can learn more about my book that this masterclass is based on.
It’s called Behind the Facade: How to Structure Your Company Operations for Sustainable Success. And I wrote it specifically for you, the owner, manager, or consultant of a fast-growing small business. When you click the resources link, you’ll also discover more about our services and special offers.
Coming up in the next episode, you’ll meet two feuding siblings who were so busy managing their respective silos at their family-owned business that the vulnerability of their network goes undetected. Sure enough, a malicious virus threatens to shut them down. Will they be able to come together long enough to get their company on the other side of this?
Stay tuned to find out. Until then, keep operating smoothly.
Thank you for listening to Business Infrastructure, the podcast about curing back-office blues with Alicia Butler Pierre. If you like what you’ve heard, do us a favor and subscribe, leave a rating, and review. And more importantly, share with your colleagues and team members who could benefit from the information. Join us next week for another episode of Business Infrastructure with Alicia Butler Pierre.


