In a previous post, I mentioned how “Green Technology is increasingly becoming the business norm for social responsibility.” However, the truth of the matter is there are still certain records that must be maintained as an original hard copy. Depending on the nature of the document, you could legally be required to keep paper records for a defined period of time (e.g. receipts) or indefinitely (e.g. birth certificate).
But what happens when you don’t know where or how to store papers such that they don’t consume you or your physical workspace? Have you ever placed a document somewhere only to not be able to find it quickly when you need it most?
That’s why Paper Records Management systems are so important. At Equilibria we define a Paper Records Management (PRM) as one that links together the processes, technology and people needed to create, name, categorize, store and purge physical data in an organized manner.
Value of a Paper Records Management System
By documenting your company’s policies and procedures for creating, naming, storing, purging, archiving, and protecting paper records you can:
- reduce time to locate files, giving staff more time to focus on revenue-generating activities
- pass industry audits and certifications via legal and regulatory record-keeping compliance
- create transparency in record-keeping
- formalize the checking in and out of shared physical data (i.e. reference manuals)
- provide proof of certain transactions
What it Looks Like (for Illustrative Purposes Only)
Paper files are categorized according to the company’s departments (as previously identified in the Business Parts Analysis. The optimal storage solution is selected for each category of information (i.e. binders, file folders) and is labeled and color-coded accordingly. In the illustration below, binders are used to store public information that employees can reserve/check-out. The binders are color-coded according to the departmental type of information it contains.

Sub-categories that are exactly like or similar to those of the Electronic Records Management system are possible through the appropriate use of divider tabs (for binders) and file tabs (for file folders). For example, in the illustration above, a binder named “Financials 2006” has 12 divider tabs on the inside, labeled January – December.
10 Steps to Organize Your Paper Records and Create a PRM System
- Take an inventory of all physical paper/record types per work area or office (this includes books and periodicals). Write the name of each record type onto separate index cards.
- Write the name of each department you previously identified in the Business Parts Analysis onto two index cards per department (preferably use a different color index card from the one used to record the names of the record types). Spread one set of the departmental cards horizontally across a large flat surface. Place the index cards containing the name of each type of electronic file under the appropriate card containing the name of a department.
- Determine which records are public vs. private. Record this onto each index card. Public documents are those that can be viewed by anyone. Private documents are those that only certain people should have access to and might even need to be placed under tight security. Reference the hierarchy of resources in your Business Design Blueprint for guidance on selecting the best level of security for certain records.
- Place the second set of index cards with department names onto different boxes or large storage containers. Place a set of empty hanging file folders inside of each box/storage container. You should also label one box for “trash” and another for “to shred” (which will contain sensitive or confidential information that should first be shredded prior to discarding.
- Choose one corner of a particular office and gather a small stack of papers. Carefully sort through each piece of paper and determine whether you need to keep it. If you do, then look to see which department the paper’s content belongs to. Place the paper(s) in the appropriate box into one of the hanging file folders. Affix a sticky note on the outside of the hanging file folder indicating the type of paper record. If you do not need to keep the paper, then decide whether to place in the trash or shred box. Repeat this process until you have gone around the entire office in a clockwise or counterclockwise fashion.
- Determine the best security option for each type of record and write it on the index card. Lockable file cabinets that are both fireproof and waterproof as well as safes are common ways small businesses can protect highly confidential information within their office/workspace. Other options include: safe deposit boxes, offsite document storage facilities with climate control and underground bunkers.
- Select the frequency at which you will purge or archive your records. Write it on each record type’s index card. This is a CRITICAL step to ensuring that paper does not unnecessarily consume valuable real estate in your office or workspace. Remember, scanning documents that you still want access to, but do not necessarily need in a physical format is an excellent way to free up workspace. The best way to determine how long to retain certain records is to consult with those governmental and regulatory agencies that have the ability to audit (and possibly fine or close) your business. For example, consult the IRS for accounting and financial recordkeeping policies and the Department of Labor for human resource (employee, intern, independent contractor) recordkeeping policies.
- Decide if you want to store paper records in hanging file folders only or a combination of hanging file folders with individual file folders nestled inside.
- Label each hanging file and/or file folder and color-code accordingly. There are several ways to label files. One of my favorite systems is the SMEAD Viewables labeling system. After each paper record is labeled within each box, prepare to transfer each hanging file into its new designated location.
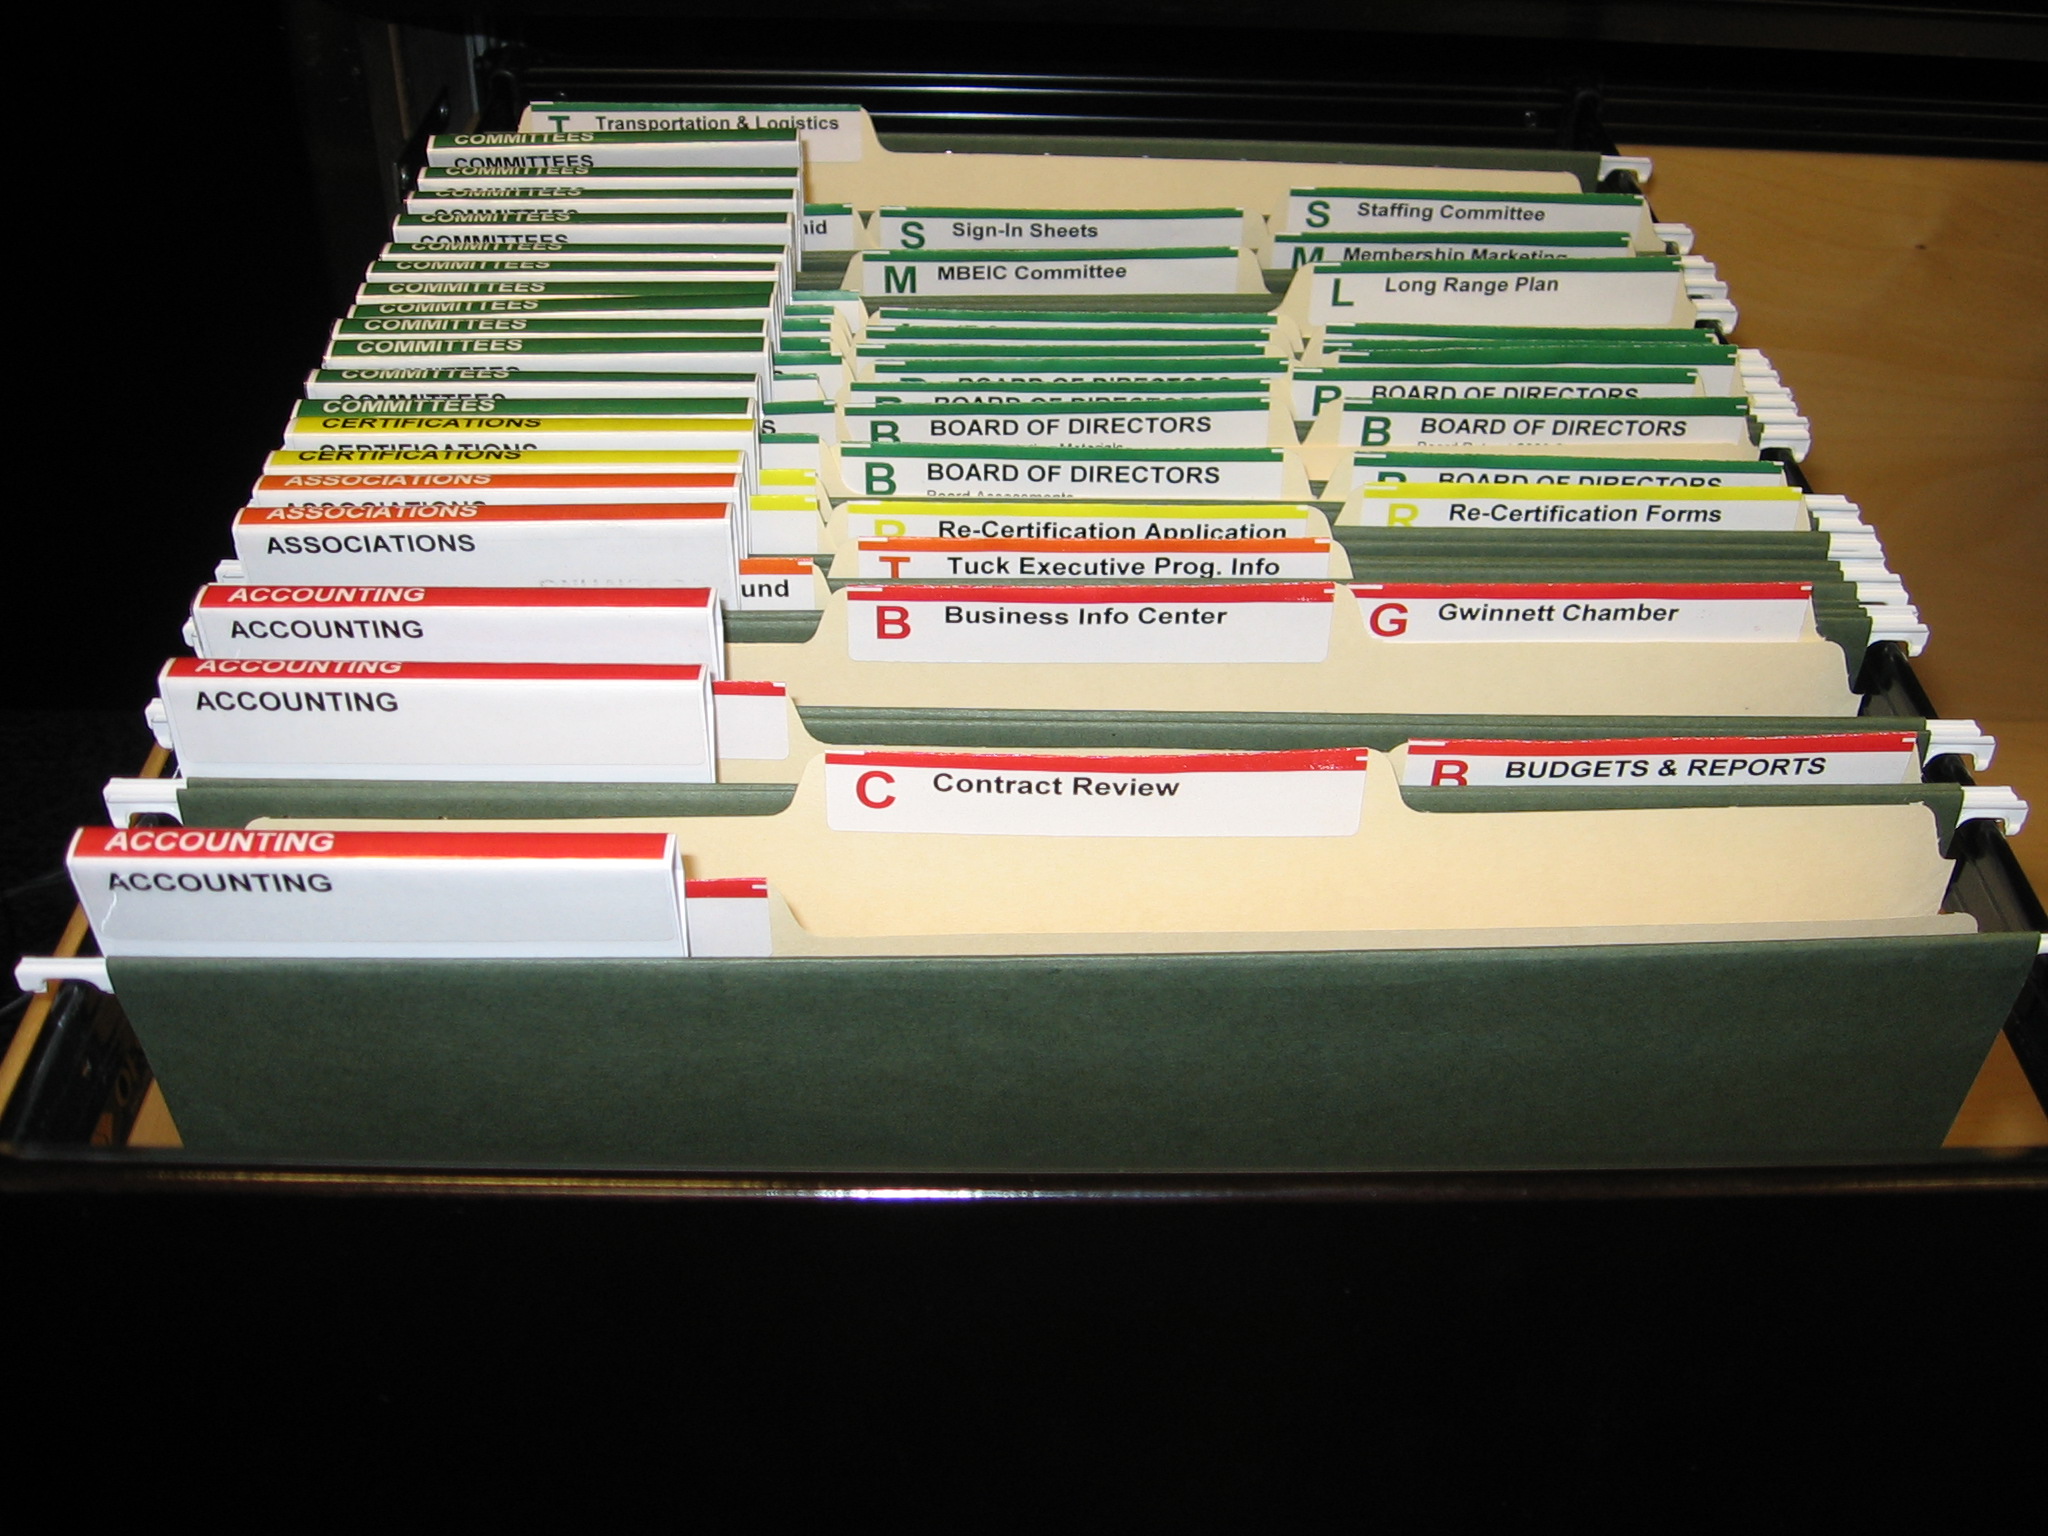
Example of Paper Records Filing System using the SMEAD Viewables labeling system. Copyright 2008. Equilibria, Inc. All Rights Reserved.
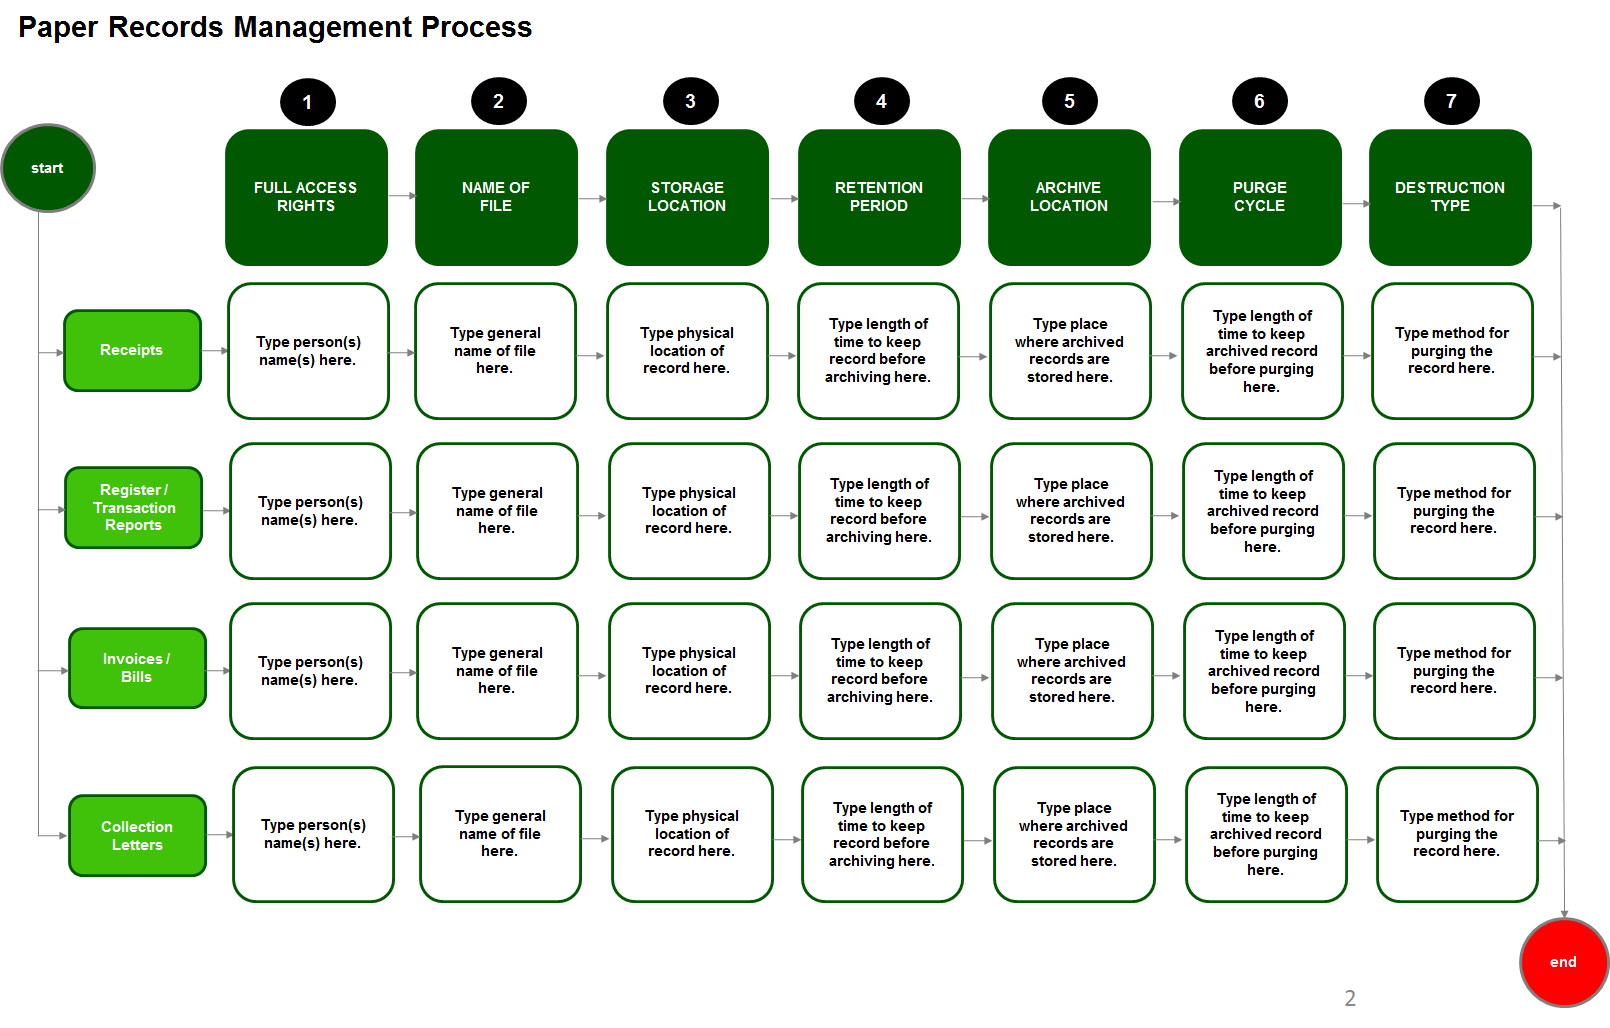
- Create a table in a spreadsheet or word processing program to capture the naming convention, storage, retention, purge, archival, and destruction cycles for each department (or category) of information. Look at the illustration below for ideas.
Share your new PRM system with your staff. Let them know the expectations for adhering to the maintenance of your company’s physical records. Evaluate whether or not (or at what point in time) you should invest in an official document management solution. This is a more expensive option since the solution is customized to your company’s specific needs.
Case Study
Why This Matters
Business Intelligence is often a key differentiator for service-based companies. Physical or paper records are a critical component of original documentation proof. It is important that staff know where to find information when they need it in order to perform their jobs well. Unlike electronic records, paper records are tangible and therefore more susceptible to compromise. A succinct Paper Records Management System ensures that physical data is handled with utmost care and security and that disaster recovery is a reality and not just a pipe dream.
Is the info in this article helpful to you? Let me know in the comments.


