Are you a small business owner that relies heavily on MS Outlook to organize emails, contact information and calendar appointments on a PC? Do you currently use a Blackberry phone? Are you thinking about upgrading to an iPhone4 or 4s? If you answered yes to all of these questions, then this will be a very useful article to assist in your transition. Turns out weaning yourself off of your “Crackberry” isn’t as intuitive a process as you might expect. I’ve segmented that process for converting to an iPhone4s into five-stages:
Stage 1: 32 bit vs. 64 bit MS Office 2010
When is innovation to much? Hmm…the release of MS Office 2010 might be one of those times. If you have upgraded to any MS Office 2010 product, then you are aware that there are now two installation options – 32bit and 64bit. Knowing the difference can save you much agony since you will need to know which version will be compatible with the existing software on your computer. You will also need to know the type of Operating System on your PC to check for potential compatibility issues with the iPhone. Check out Microsoft’s Compatibility Center to learn more. Knowing this will be critical to making sure the iTunes and/or iCloud apps needed for your iPhone will work optimally.
Stage 2: Third Party Server vs. Microsoft Exchange Server
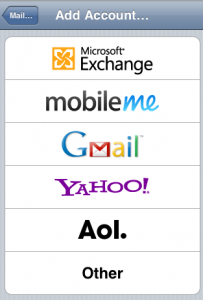
Is your email setup in MS Outlook through a third party server or via a MS ExchangeServer? The answer to this question will let you know which option to select when setting up your company email (and subsequently contacts and calendar) account on your iPhone. More than likely if you are the owner of or if you work for a microenterprise, your email account is provided through the company that hosts your website. That means your email is retrieved through a third party server and you happen to use MS Outlook (as opposed to Gmail, Yahoo!, etc.) to track your email, contacts and calendar information. You will need to select the Other option on your iPhone’s mail settings. In contrast, MS Exchange servers, in my experience, are typically created for much larger companies or for those small businesses fortunate to have in-house resources that maintain a unique company server. In this case, you select the Microsoft Exchange option.
Stage 3: iTunes vs. iCloud
Hands down, the data synchronization capabilities of the Blackberry are its best-selling feature and this is why so many businesses still cling to the Blackberry. As you convert to the iPhone, you need to know and understand the difference between the two options (iTunes and iCloud) for synchronizing your email, contact and calendar data. At this time, you should also find out the incoming and outgoing server information for your IMAP or POP email account if you have not done so already.
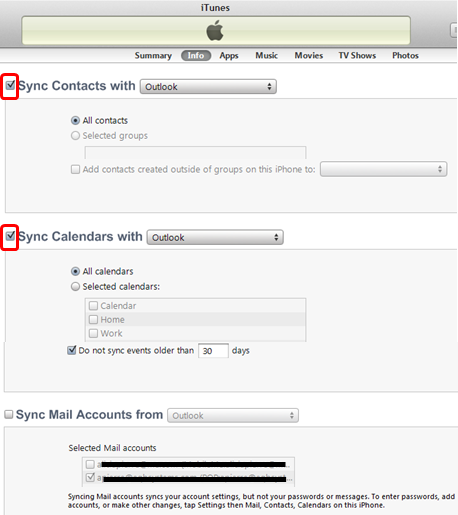
iTunes is popularly known as a hub for downloading and storing media, but it also serves as the medium through which you can exchange data with MS Outlook via a USB connection from your iPhone to your PC. There is a major caveat you should know about, especially if you set up your email to sync via iTunes. iTunes does not offer a true data synchronization between the iPhone and MS Outlook. That is, if you delete an email on your iPhone, it will still appear in your Outlook inbox and vice versa, even after you hit the Sync button on the iTunes dashboard. For this reason, my personal preference is to only allow iTunes to sync calendar and contact information as shown in the screenshot below:
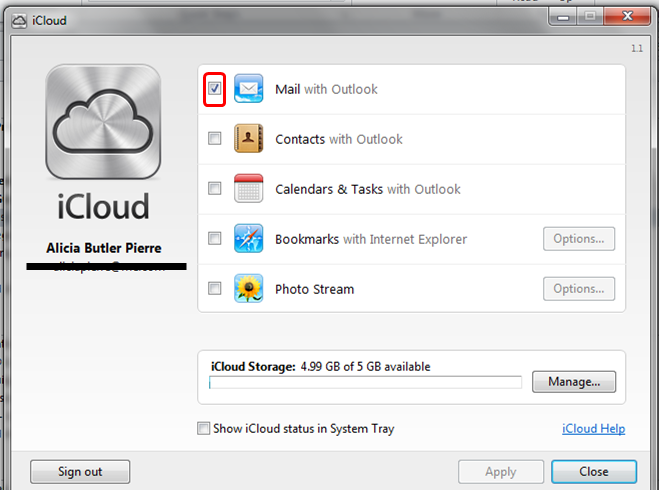
iCloud is Apple’s cloud storage solution and is free up to 5GB. It requires the creation of an Apple ID ([email protected] email account). This is the app I highly recommend if you want to maintain efficiency in email management. Once you install the iCloud app on both your iPhone and PC, you will be able to truly synchronize your email. That is, if you delete an email from your Outlook inbox, it will also immediately be removed from your iPhone and vice versa. Unlike iTunes, data transfer with iCloud happens wirelessly. It’s a good idea to activate or turn on the wireless connection on your iPhone when setting up iCloud for the first time to ensure a seamless download. Once iCloud is installed, it will appear on the Network and Internet section on your PC’s Control Panel. It is here where you will select the option to synchronize email only (since the contacts and calendar will be synchronized via iTunes).
Stage 4: Setup
Now that you’ve decided how you want to setup and synchronize your email account as well as your contacts and calendar, you are ready to install one or both of the applications. My recommendation to entrepreneurs and small business owners is to use iCloud for synchronizing email and iTunes for synchronizing contacts and calendar appointments. The following flow diagram (which you can download) shows the process or sequence of steps to take for installing both apps.
It is important to remember that even if you only setup calendar and contact synchronization for iTunes, you will still have to install your actual email account, just deactivate the email synchronization feature. Likewise, when installing iCloud, you can deactivate the contact and calendar synchronization features.
- Click here for general details on installing a new email account on your iPhone.
- Click here for detailed steps on installing iCloud.
- Click here for detailed steps on installing iTunes.
Stage 5: Test & Validate
Once you’ve set everything up, it’s a good idea to start testing the setup and validate that all data synchronization is working properly.
 Create a new contact and add a few calendar appointments in MS Outlook.
- Connect your iPhone to your PC and press the Sync button on the lower right hand corner of the iTunes dashboard.
- Make sure the new contact(s) and appointments appear in the respective areas on your iPhone.
- Send yourself a test email from your iPhone.
- Open MS Outlook and make sure the message appears in your inbox under the Apple ID email account.
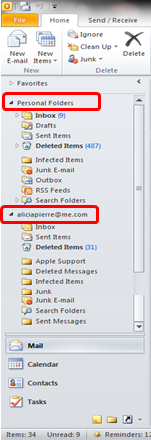
- Setup a calendar appointment to remind yourself to periodically empty the Deleted Items, Deleted Messages and Sent Messages folders (note the screenshot to the left). This will ensure you do not run the risk of going over your free 5GB limit on iCloud. This is especially important if you normally send and/or receive emails with large attachments like pictures and documents. Remember, iCloud literally mimics your every move when it comes to email. A sent or deleted email in one system will also show in the other.
- Enjoy your new iPhone!
Blackberry Withdrawal – My Personal Story
The inspiration for this post began a few weeks ago when I was recently forced to upgrade my Blackberry 8830 phone. I am admittedly a late adopter when it comes to certain technologies. To my dismay, my Blackberry’s Desktop Manager software is not compatible with the 64 bit version of MS Outlook 2010 installed on my PC. Facing the inevitable, I went to my cell phone service provider who gently reminded me that I was eligible for a phone upgrade. “I’m looking for a new Blackberry phone,” I confidently stated. The salesman answered, “Why are you getting another Blackberry? Why not get the iPhone? Its technology is superior and besides RIM is on its way out anyway.” As an entrepreneur, I’m no stranger to risk so I decided to purchase the iPhone which was actually $100 cheaper than the Blackberry I originally wanted. Almost immediately afterwards, I was on the phone with my cell phone provider’s technical support team trying to figure out why I could not get my email account setup. Unfortunately, they were of little help and I ended up going to buy a 570 page book on how to use the iPhone (this is my first ever Apple product purchase and it was frustrating not having a manual to come with the phone). The next obstacle was figuring out how to do a full synchronization of my email in particular. Even the book I purchased did not cover this topic and it wasn’t until I was put in touch with a very patient and knowledgeable Apple support technician, Adam, that I learned about the true benefit of creating an iCloud account. So, I hope this article proves to be helpful particularly to those of us who were once Blackberry die-hards and are now transitioning to the iPhone.
Disclaimer: if you see anything in this article that needs revision or clarification, please let me know in the comments section below. With Apple’s recent release of the iPhone5, I cannot guarantee that the procedures in this post will work. If in fact it does, please let our online community know!


